
General Tips
- Try placing your phone or tablet in a clear plastic bag to keep the propolis off it. The touch screen should still work through the bag.
- Invest in a touch screen stylus (example stylus pen). This will help keep your phone or tablet clean and allow you to use the app without having to remove your gloves.
- To get rid of the popup keyboard press the Done button or the back button.
- Pressing the back button twice within a couple of seconds will exit the application.
- If you enter your email address using the Setup screen (More > Setup) the app. will remember it and apply this address every time you send an email from this app.
- Data is entered into the database as soon as you start typing into one of the data entry fields. There is no commit/save/done button for data entry.
- Note: Your email address is not used by us or any third party. As with any information entered into this app it doesn’t leave your device unless you email it to the address you entered in either Setup or your email software.
Key
![]() – Selection either by entering your own text or selecting an option from a drop down list.
– Selection either by entering your own text or selecting an option from a drop down list.
The dropdown list will appear after you have entered two or more characters.
o Buttons, scroll bars, tick boxes that are greyed out have been locked and cannot be used. This is either because there is a menu waiting for a button to be pressed / selection to be made
or you are at the first or last record
or the Time Based Screen Lock has been activated.
Data Entry

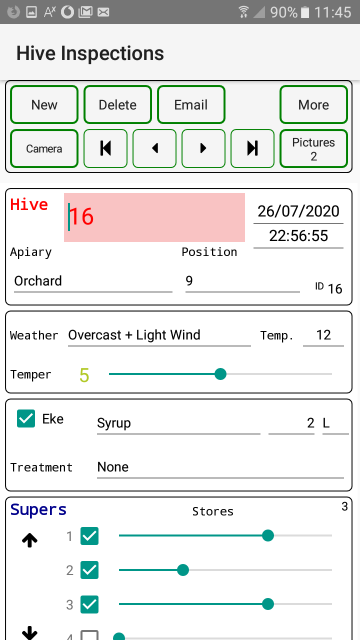
Hive
This is either your hive number or hive name
Inspection Date & Time
These are added automatically by the system when you press the New button. If you edit the date then it must be in the same format – dd/mm/yyyy eg 18/07/2020. If you edit the time it must use the 24 hour clock and be formatted as hh:mm:ss eg 15:05:00. NOTE: Records will be automatically sorted by date and time. Use the right arrows to move towards the newest/youngest records and the left arrows to move towards the oldest records (see Control Buttons for more details).
Apiary 
The name/location of the apiary. If you only have one then just leave this blank.
Position
As well as a hive number we also use a position number or name that is attached to each possible hive location. If you don’t work this way just leave this value blank.
ID
This is the record number in the database.
Weather
A simple and short description of the weather.
Temperature
The temperature in whatever units you like.
Treatment
Generally refers to Verroa treatments applied during this inspection, although you can use this field for any treatments you have applied.
Temper
A general estimate of the bees’ temper. From very docile (0) on the left to totally bonkers (10) on the right.
Eke
If ticked then an eke is present.
Food Type
A dropdown list of possible food types. Select or enter the food type you have added in the eke. You can enter your own types either here or in the relevant part of the Setup screen.
Food Quantity
The quantity of food added.
Units
Either L for Litres or Kg for Kilograms.
Supers
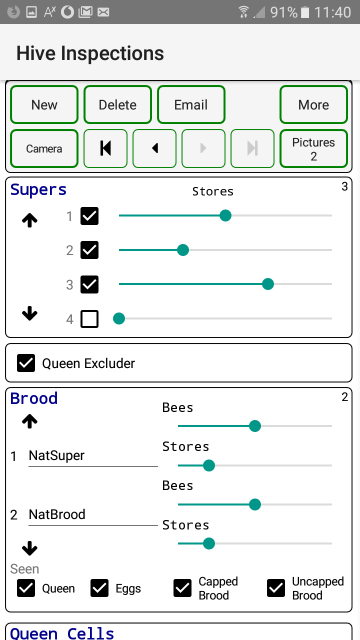
Supers 1 to 16
If ticked then that super is present. Super 1 is at the top, super 4 is at the bottom. The app allows for a maximum of 16 supers. Use the up/down arrows to show each set of 4 supers. It doesn’t matter if you leave gaps when selecting supers or create gaps when you remove supers. Just keep an eye on the super count field – the number in the top right hand corner of the Supers panel.
Stores 1 to 16
An estimate of the honey and/or pollen in each super. From totally empty (0) on the left to totally full (10) on the right.
Queen Excluder
If ticked then a queen excluder is fitted.
Brood
Brood Box Type 1 to 4
A drop down list of brood boxes. Box 1 is at the top. The app allows for a maximum of 4 brood boxes. Use the up/down arrows to show each set of 2 brood boxes. Keep an eye on the brood box count field – the number in the top right hand corner of the Brood panel.
Bees
An estimate of the number of bees in each brood box. From totally empty (0) on the left to totally full (10) on the right.
Stores
An estimate of the honey and/or pollen in each brood box. From totally empty (0) on the left to totally full (10) on the right.
Queen seen
If ticked then the queen was seen.
Eggs seen
If ticked then eggs were seen.
Capped Brood
If ticked then capped brood was seen.
Uncapped Brood
If ticked then uncapped brood was seen.
Queen Cells
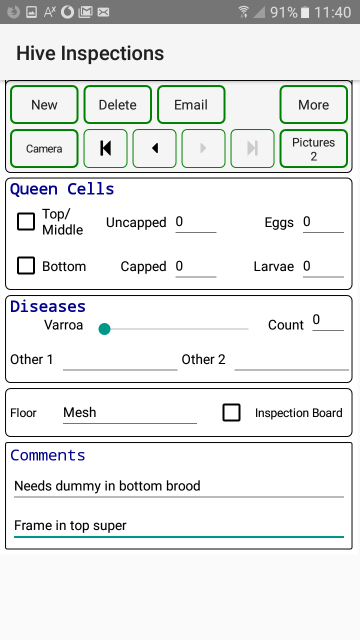
Top/Middle
Queen cells seen in the middle or at the top of a frame.
Bottom
Queen cells seen at the bottom of a frame.
Uncapped
An estimate of the number of uncapped queen cells seen.
Capped
An estimate of the number of capped queen cells seen.
Eggs
An estimate of the number of queen cells seen containing eggs.
Larvae
An estimate of the number of queen cells seen containing larvae.
Diseases
Varroa
An estimate of the Varroa population in the hive. From absolutely none (0) on the left to totally crawling with them (10) on the right.
Count
The number of mites counted on the inspection board over an x day period. We use a 7 day period, but whatever you use stick with it and be consistant.
Other 1 and Other 2
Two opportunities to record any other diseases spotted in the hive.
Floor
Floor Type
The type of floor fitted.
Inspection Board
If ticked then an inspection board is fitted.
Comments
Two lines of free text for comments.
Control Buttons
![]() – Go to first record (oldest)
– Go to first record (oldest)
![]() – Show previous record (older)
– Show previous record (older)
![]() – Show next record (younger)
– Show next record (younger)
![]() – Go to last record (youngest)
– Go to last record (youngest)
If any of these buttons are coloured grey then they have been disabled ie you are at the first or last record.
New
Pressing this button creates a new record. It automatically fills in the date and time.
Delete
Deletes the current record. You will be asked if you really want to delete the record but once it has gone then it cannot be recovered.
Pressing this button will open your email software and show you a simple report for the current inspection record. Press the send button in your email app to send it to the email address you entered in the Setup screen.
The software will attach to the email any pictures that haven’t already been marked as “emailed” as well as one or more text, pdf and/or csv report files.
NOTE : To send emails you will need a preconfigured email application already installed on your device. You will also need an email account. You will not be able to send emails from this application if you only have a web mail account and only ever send emails from your internet browser.
Camera

Opens the device camera and allows you to take pictures. Each picture file is saved with the hive number/name that was on screen when you pressed the Camera button. The idea is to take pictures of important things – queen cells, broken hive components etc. These should be emailed to yourself and then deleted from the phone/device.
The button with the camera icon takes a picture, the slide bar zooms in or out (if your phone supports it – it may appear to zoom but only save an unzoomed picture) and the Done button closes the camera.
The camera function automatically focuses but you may have to wait a second or two or recompose the picture for it to focus correctly.
The picture you have just taken will remain on the screen for a few seconds, you will then be returned to the camera screen. If you want to return more quickly then just click on the displayed image.
Keep an eye on the file storage (More > Setup > File Sizes) as it doesn’t take long to fill your device with photographs. See also Delete Options (More > Setup > Delete Options) for automatic deletion of emailed pictures or File Delete (More > File Delete) and the Pictures button (Pictures) for manual deletion of pictures
Pictures
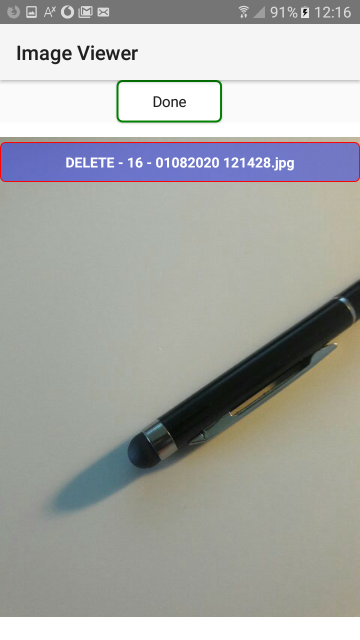
The number below the button label shows the number of pictures stored for this hive. if the button is greyed out then there are no pictures to display.
Pressing this button will shows a scollable view of all pictures taken by the app. for the displayed hive. If pressed, the button at the top of each picture will delete the picture from your device (it will ask for confirmation).
If the button label starts “Delete – Emailed” followed by Hive number/name, Date & Time then the picture should have been emailed to you and it should be safe to delete it – check your inbox first. If the label just starts “Delete” then consider emailing the picture before you delete it.
Note: The image viewer will only display 50 pictures per hive.
More

X
Closes this menu.
Help
Shows you this page.
Images Button (on the Help page)
This shows a scrollable set of helpfull images. At the current time a bee life cycle diagram, pictures of a queen, drone and worker bee, the bee year, diseases …
Help Images
As above.
Setup
See below
Setup
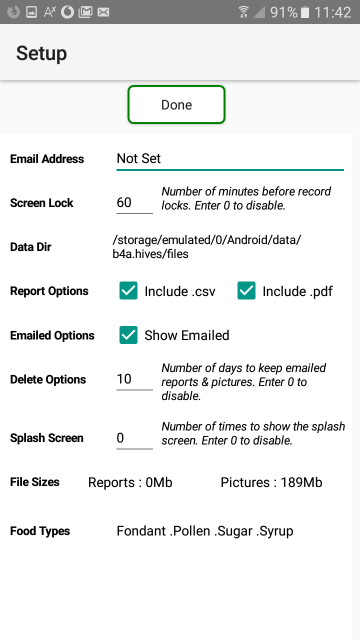
Email Address
If you enter your email address here then you will be able to send yourself pictures and simple reports of each hive inspection. (see Note above)
Screen Lock
The number of minutes before the record is locked against editing (it will still be deletable). This feature prevents you accidently changing a description or value as you scroll through old inspection records. The value you use will depend on how quickly you complete each hive inspection. Setting this value to 0 (zero) will disable this feature.
Data Directory
Where the reports and pictures are stored on your device. It is safer to delete these files via the app. as doing so any other way could confuse the database. This option is readonly and cannot be changed.
Report Options
When you press the Email button the software generates one or more reports that are then attached to the email. There will allways be a .txt report attached as these are the simplest to read by other software. If ticked you can also include a .pdf report (slightly prettier than the .txt file) and a .csv report (These files are opened by Microsoft Excel and similar software).
Note: The .csv file includes every record in the database, the idea being that you can keep a spreadsheet version of your inspections on a PC or laptop
Emailed Options
Relates to the File Delete/File Manager page. If ticked then the list of files and pictures will be restricted to those you have emailed. This tick box is repeated on the File Delete/File Manager page.
Delete Options
This is the number of days to keep emailed reports and pictures. As an emailed report or picture should now be stored in a second location it should be safe to delete it from your phone or tablet. If you do not feel safe doing this then set the number of days to zero and nothing will be automatically deleted. There is no confirmation request when this option is activated.
Splash Screen
The number of times the splash screen is displayed. This number decreases by one every time you run the app. until it reaches zero Setting it to zero here will prevent the flash screen displaying the next time you run the app.
File Sizes
The total space used by reports and pictures in megabytes (Mb).
Dropdown Values
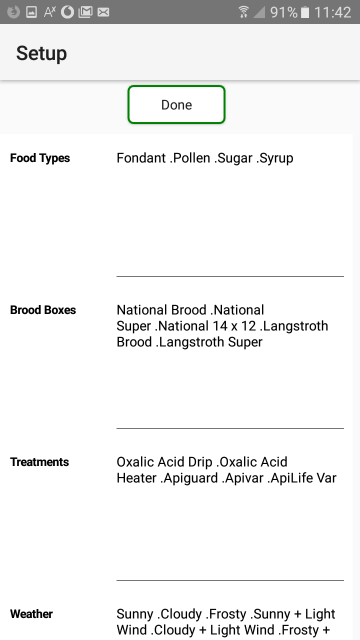
The lists of values used for each of the drop down lists in the main inspection screen. You can edit these lists as much as you like BUT you must separate each entry with a full stop (.). The application uses these lists to populate the various drop down lists on the main data entry screen. It also uses any entries that you have made on the data entry screen. So you can either spend time modifying these lookup lists or simply type in any missing descriptions as you enter your inspection details. Either way any description you add will be available for your next inspection record.
Reset and Restart
At the bottom of the Setup screen there is a Reset and Restart button. Pressing this button will delete all inspections from the database, delete all stored reports and pictures, and reset the Setup parameters to their original values. It will ask for confirmation before anything is deleted, but once deleted your data cannot be recovered.
File Delete
Pressing this button opens the File Manager screen.
- The Done button exits the File Manager.
- The Pictures and Reports radio buttons toggle between listing stored pictures and reports.
- If unticked the All Hives tick box causes the screen to only show files for the hive number/name you were viewing when you entered this screen. If ticked it displays either Pictures or Reports for all hives.
- If unticked the Emailed Only tick box shows both emailed and unemailed files. If ticked it only lists emailed files.
- Pressing the Delete All button will delete all files in the list. You will be asked for confirmation.
- Pressing any of the coloured buttons in the files list will delete that individual file. You will be asked for confirmation.
The file buttons in the list are formatted as follows;
DELETE – Emailed – Hive – ddmmyyyy hhmmss.ext
or DELETE – Hive – ddmmyyyy hhmmss.ext
or DELETE – Inspections.csv
About
A few words about us and the application.
Exit
Exits the application immediately.
Viewing A Single Hive
This function allows you to scroll through the records for a single hive number.
To activate first select the hive number or name you are interested in by using the first, previous, next and last buttons at the top of the screen.
Then click on the word ‘Hive’ just to the left of the hive number/name. The word Hive and the entry field for the number/name will turn red.
You will now be viewing a shorter list of hive inspection records all for the selected hive number/name.
To turn this feature off simply click on the word ‘Hive’ again.